Project & Insights
How do you stop water coming in through a cable penetration in a garage wall?
August 18, 2026
By Valeriy, Application Specialist, JSW Waterproofing
Valeriy — Application Specialist, Joint Seal Waterproofing — fifteen years injecting expansion joints across the GTA
A cable penetration through a garage wall is sealed by excavating to it, stripping everything loose back to solid concrete, and rebuilding the seal as a bonded, membrane-reinforced system rather than a lump of concrete. For a single penetration about five feet down under grass, that is roughly two days of work and $3,000 to $4,000 in the GTA. The reason it is worth specifying properly is that the cheap version of this repair routinely fails inside one season.
Why bag-mix penetration repairs fail within months
We see these repairs done with ordinary bag concrete. They mix it on site, slap it around the penetration, and that is the repair. There is no bonding agent, no waterproofing layer, and nothing accounting for the fact that groundwater on the outside of a garage wall sits under pressure.
That concrete dries, shrinks and cracks. Once it is soaked and under hydrostatic pressure with no membrane over it, the water degrades the concrete itself and works back through. On a Vaughan condominium garage we inspected this month, a previous repair by another contractor had slowed the leak noticeably at first — and within a couple of months the sheeting and dripping inside the garage was back to roughly what it had been before the work was done.
That failure curve is the tell. A repair that works immediately and then degrades steadily over a few months was never sealed; it was blocked. Water always finds the weakest path back.
The build-up that actually holds
The sequence matters as much as the materials. It follows the same principle as any sound concrete surface repair — remove what is unsound, bond to what is left, then protect it — with a waterproofing layer added because this one sits against groundwater. Each layer does one job, and skipping any of them puts the whole repair back in the bag-mix category.
- Remove everything loose. All of the previous repair, plus any loose concrete or material around the penetration, comes out. The repair only works if it is built on sound substrate — solid concrete of the wall to work with.
- Bonding agent. We use Polyforce. This is the layer that makes the repair part of the wall rather than something sitting against it.
- Quick-set hydraulic waterproofing cement. A leak-stop type cement, which sets fast and holds against active water rather than washing out while it cures.
- Bonding agent again, coating over the cement.
- Cold-applied membrane, first layer.
- Reinforcement — fibreglass mesh or geotextile fabric, embedded into the membrane.
- Cold-applied membrane, second layer over the reinforcement.
The reinforcing layer is the part most often left out, and it is the part that gives the repair strength rather than just a skin. A membrane on its own over a penetration will seal it; a membrane with fibreglass or geotextile inside it resists being pushed back through by groundwater pressure.
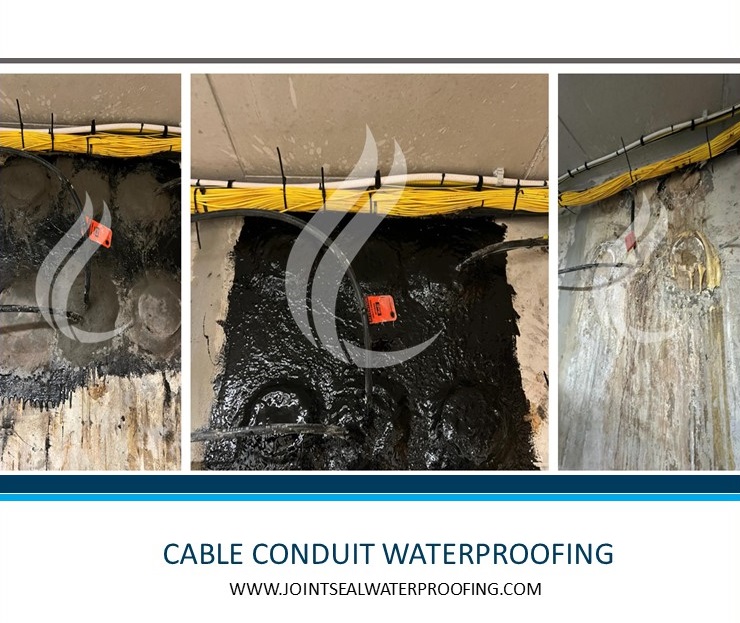
That exact sequence is what went onto seven conduits penetrating the wall of an events salon on Lakeshore Rd in Mississauga, where water was getting into the basement: substrate cleaned with solvents to drive off remaining humidity, first coat of cold-applied polyurea, fibreglass reinforcement, second coat — carried over the conduits and the wall around them, not just the holes.
When a penetration has to be dug up — and when it doesn’t
Most leaking conduit penetrations do not need excavation, and we seal them from inside the garage regularly. At a shopping centre on Woodbine Ave in Markham, where a cable conduit through the wall was leaking into the underground parking, the repair was done entirely from the garage side: wire-brush the wall, parge the section housing the conduit, coat it with a cold-applied polyurea material. At a high-rise on King Street in Toronto, where leaks started in the garage after an internet cable conduit was run through the structure, hydraulic cement went in around the pipes first, then a polyurea membrane and a fibreglass sheet over the top.
So the honest answer is that it depends, and the deciding factor is usually what you already know about the penetration.
Excavation earns its cost in three situations. When there has already been a repair and it has failed, because you cannot judge the condition of something buried — you have to see whether the original encasement is cracked, whether the cables have shifted, and how much sound concrete is left to build on. When groundwater pressure on the outside face is high enough that an interior seal will simply be pushed off. And when the interior face has already been coated once and the water reappeared somewhere else along the wall.
The Vaughan job is the first of those. A previous contractor’s repair slowed the leak and then let go over a couple of months, and nobody can specify the fix properly without opening it up and looking at what is actually there. That is a diagnostic argument as much as a waterproofing one.
Where excavation is the call, the water is on the outside pushing in, which is the opposite of most garage water problems — a leaking expansion joint or crack in a ceiling gets sealed by negative-side injection with no digging at all.
On the Vaughan job that means excavating roughly five feet down, which is where the penetration sits. Because the ground above is soft landscaping — grass — reinstatement is simple: the existing spoil we removed goes back, then a little topsoil and seed. That is a meaningful part of why the number stays in the three to four thousand range. Put asphalt or hard landscaping over the same penetration and the reinstatement alone changes the arithmetic.
What to ask for before the hole is filled in
Ask for photographs at each stage, before backfill. Once that excavation is closed, nobody can tell the difference between the repair described above and bag mix.
The four photographs worth insisting on: the penetration stripped back to sound concrete, the hydraulic cement in place, the reinforcement embedded in the first membrane coat, and the finished second coat. A contractor doing the work properly will not object to taking them. One who does object has told you something.
Two days is also the honest timeline, and it includes cure time — the repair has to set up before anything goes back on top of it. A crew that excavates, patches and backfills in an afternoon has skipped the part that makes the repair last.
If water is coming into your garage at a service penetration, get the source located before anyone quotes a number, because the drip inside is often nowhere near the breach — the tracing problem is covered in our guide to water running out of a conduit box in a garage ceiling. JSW inspects and repairs parking garages throughout Toronto and the GTA, and we will tell you where the water is actually entering before we price the work.
Common questions
Frequently asked questions
Why do cheap concrete patches around a wall penetration fail so fast?
Ordinary bag concrete packed around a penetration has nothing bonding it to the existing wall and no waterproofing layer over it. It shrinks and cracks as it cures, and once groundwater sits against it under pressure the concrete degrades and the water finds its way back through. A repair like that commonly loses most of its effectiveness within a few months.
How long does it take to excavate and seal a garage wall penetration?
About two days for a single penetration, including the excavation, the repair itself, and the cure time before backfilling. That assumes the penetration is roughly five feet down and the ground above is soft landscaping. Hard landscaping or asphalt over the excavation adds reinstatement time and cost.
How much does it cost to repair a leaking cable penetration in a garage wall?
In the range of $3,000 to $4,000 for a single penetration in soft landscaping across the GTA, covering excavation, the sealing build-up, backfill and reinstatement. Depth, access for a machine, and what sits above the penetration are the three things that move that number. Asphalt or hardscape above will push it higher.
Does the landscaping have to be dug up to fix a leaking wall penetration?
Often not. Many leaking conduit penetrations are sealed from inside the garage — wire-brushing the wall, parging the section housing the conduit and coating it with a cold-applied polyurea material — with no digging at all. Excavation earns its cost mainly where a previous repair has already failed, because the condition of a buried penetration cannot be judged without exposing it. On grass the reinstatement is straightforward: the existing spoil goes back, topped with topsoil and seed.
How can a property manager tell the penetration repair was done properly?
Ask to see photographs of each layer before the excavation is backfilled. A sound repair shows loose material removed back to solid concrete, a bonding agent, a hydraulic waterproofing cement, then a cold-applied membrane with a fibreglass or geotextile reinforcing layer sandwiched inside it. If the only photograph is of finished concrete, there is no way to know what is underneath it.
Related services & repair types